Followers

Friday 29 May 2015

Adorimal Dragon - for Paperbabe Challenge

Hiya and welcome to my Blog

Today we have a new Challenge for you over at Paperbabe Stamps Blog and the theme for this fortnight is 'Brights' which is perfect for the Spring-into-Summer season 

I could not resist creating a little Dragon from the DesignA Adorimals stamp set and Kawaii Face stamp set - there wasn't a Dragon in the set as such but using the available Stamps and some Imagination this little cutie was made


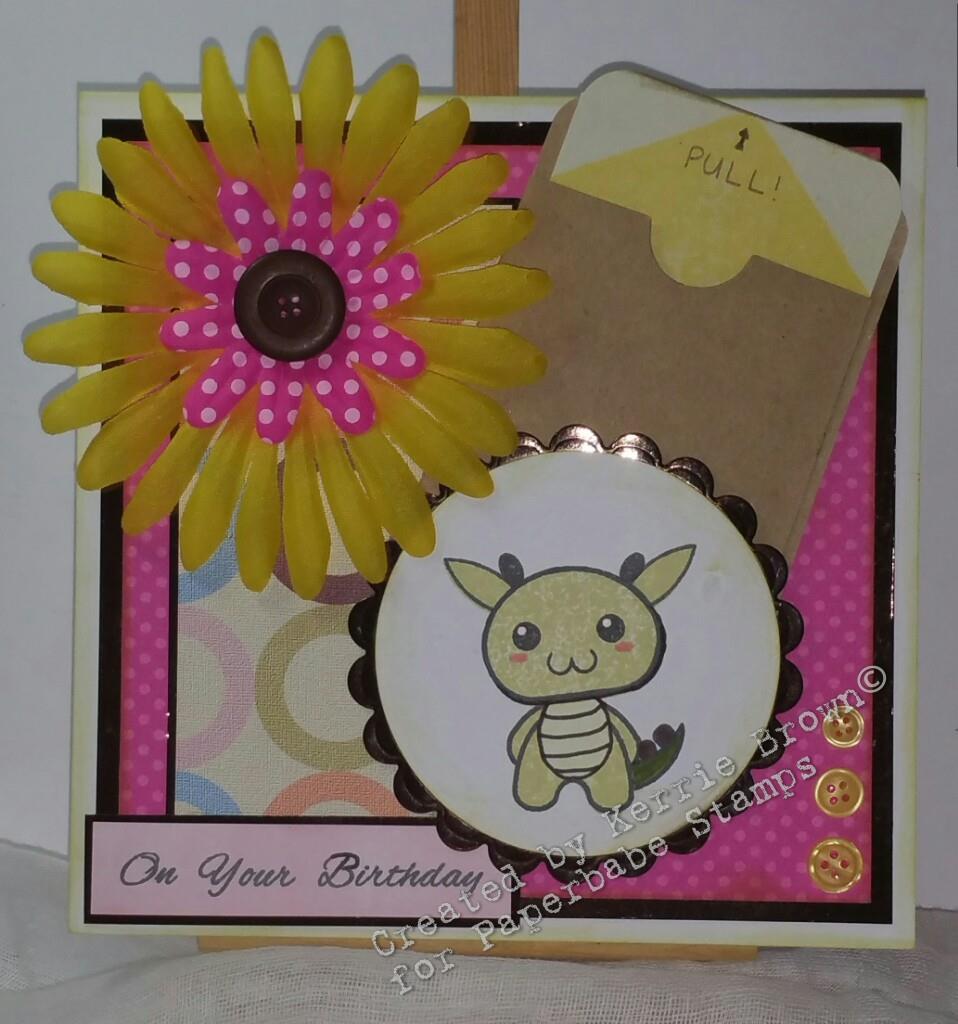
I stamped him using Memento ink and using the masking technique with post its to help his ears and tail look like they are behind the head/body. I used Distress Inks and Papermate Flair pens to colour

I teamed him up with some Bright papers from my stash which I also had some fabric flowers to match. I used some Chocolate coloured mirror board for matting to tie it all together.


I am a little bit addicted to Project Life cards at the moment and I had this bright yellow arrow card which I have stamped onto to create a little hidden message inside a card pocket from 'We R Memory Keepers' - the Paperbabe stamps I have used for the card are... 'Pockets Full Of' from the Completely Conkers set, 'diagonal stripe border' from the Fabulous Everything set and 'Love' from the Joy, Peace, Love set.

I also used a few of the words from Fabulous Everything to create the Birthday sentiment which I tucked in under the topper.

I hope you like my project today please do visit the Paperbabe Stamps Blog and enter the brilliant challenge where you can win up to £20 to spend at the Paperbabe Etsy Shop

Krafty Hugs xx
Paperbabe DT

Friday 22 May 2015

Filofax Original in Lilac - mmmmmmmmm Review

Eeeeeeks today I am showing off my 'Brand New' Orginal A5 Filofax in Lilac - the official release date for these is 31st May - a few online store's are sending them out this week and I have been given the oportunity to review them - I also have the Personal Size which I love love love and I received her a few days ago :)

So this is my first ever Filofax Review - I will be expressing only my own opion's on the Planner I'm not affiliated by any company for Review Purposes.

This Beauty arrived today perfectly packaged in a cardboard wrap around carton which pretected her completely in the courier's van and the rings are perfectly aligned plus nice and tight. The smell of the gloriously thick leather hit me as soon as I opened the box mmmmmm and I know the smell will last as my other Orginal Filofaxes still have it too


Here she is in all her gorgeous Lilac glory - still in her Acetate Sleeve - this colour is so stunning and Im really happy that my camera has captured her true colour so mmmmmmmmmm


I really love the lilac against the black interior - you do get a lot of inserts which is really nice and is brilliant to get started straight away - another fave of mine about the orginal is the gorgeous Filofax debossed stamp on the inside cover - my fave of all the Filofax brand stamps ever


The diary insert's are for 2016, so I will be printing out some 2015 inserts from May but thats ok as I need to print out A5 monthly and daily inserts any way to be able to use her efficiently. I also will be making some pretty dividers, book marks and clips to colour match


This is the layout of the 2016 Diary - of course I know a lot of people prefer different styles but I quite like this layout for using larger stickers to decorate in the same format as Erin Condren or similar style layouts.

Well there isnt much more I can say about this gorgeous planner at the moment but I will be back soon with lots of pictures once she is set up and decorated how I like xx

Thank You for visiting today

Planning Hugs xx
 

So Adorimal!! - Paperbabe

Hiya and welcome to my blog

Today I am really excited to share with you some of my makes using the Brand New stamps that are available on Paperbabe's Etsy Store to buy from Saturday 23rd May eeeeks!

https://blogger.googleusercontent.com/img/b/R29vZ2xl/AVvXsEgDYWb8hruiojmXa3ZzEzYHx8ewkpGDaT3GezxS9_MypaQC4miwoMDY1N1rR4i_TaTmLbuzyj3dlH-fU0SZbxVqfjj2_1ywe98kyWe2LawBYx177v5XdCcZLyjZ0gXjF_W1xvwCpbimSkGV/s1600/DesignA+Adorimals%2528wm%2529.jpg

 This is a really cute set to create little Adorimal's - I really love all these cute Images that are so popular right now not only in the world of craft but in the world of planner's too - they team up perfectly with yesterdays preview 'Kawaii Faces'

Here are a few samples I have made using the two sets together

 For this card I have used the Stamps to paper-piece a  bunny onsie onto an Adorimal

I then used some more stamps to create these cute Bunny and Fox paperclips for my Planner's

Here you can see them peeking out from the tops of 2 of my planner's

I had a lot of fun incorporating them into my planner layout's in my A5 Blog Planner 

I hope you like the sample cards I made 

Now head on over to the Paperbabe Stamps Blog to see more details about these gorgeous cuties and there you will find links to the other Design Team Members Blogs where you can see what they have created to show you too

Thank You for visiting - hope to see you again soon

Krafty Hugs xx

Thursday 21 May 2015

Introducing the Brand New Stamps from Paperbabe

Hiya and welcome to my blog

Today I am really excited to share with you some of my makes using the Brand New stamps that are available on Paperbabe's Etsy Store to buy from Saturday 23rd May eeeeks! 

The first is a really cute set to create little Kawaii Faces - I really love all these cute Images that are so popular right now not only in the world of craft but in the world of planner's too 


The second is a set of gorgeous Digi Adorimals - they are all so so cute 


Here are a few samples I have made using the two sets together 


I hope you like the sample cards I made 

Now head on over to the Paperbabe Stamps Blog to see more details about these gorgeous cuties and there you will find links to the other Design Team Members Blogs where you can see what they have created to show you too

Thank You for visiting - hope to see you again soon

Krafty Hugs xx

Saturday 16 May 2015

Gorjuss Girl 'Pretty in Pink' - for Crafting Musketeer's

Hiya and welcome to my Blog. Today I am sharing with you my make for Crafting Musketeer's Challenge 'Midway Inspiration Post

This month we have been celebrating 'Crafting Musketeer's 2nd Birthday' such a lovely team to be a part of 

The Challenge this month is 'Use a Die-Cut' and we are sponsored by 'The Hobby House' and  JGD Crafts two really lovely companies

Here is the card I made for the challenge...


I chose a delicate floral paper and coloured a Gorjuss stamp to colour match using my Copic Markers

I then chose some Kraft Card, Pearlescent Cardstock's and Crochet Lace to tie in all the colours, I love to use lots of layers and pretty flowers so I really loved putting this one together


The die's I have used are 'Xcut - Doily' and a 'Spellbinders -Foliage', I also found a diecut Pink flower in my stash box so I curled the petals and pinched the ends and added this to the floral spray on the card

Thank You for visiting today and I do hope to see your gorgeous makes over on the Crafting Musketeer's Challenge Blog

Krafty Hugs xx

Friday 15 May 2015

Floral 'Mayleedee' - Paperbabe Stamps

It's Challenge Time over at Paperbabe Stamps Blog

The theme is a Picture Inspiration - you can make anything you like using the colours in the picture as your guide

 
Paperbabe Challenges are open to everyone...
As usual you are welcome to combine with other challenges and enter as many times as you like!
 
Please be sure to link your project back to the Paperbabe Blog for a chance to win Paperbabe Stamps Gift worth up to £20. Thank you for your gorgeous entries on our last challenge. The winners will be announced next week before our new release starts!
 
I chose to use 'Mayleedee' for this Challenge and I coloured her using my Copic Markers - her dress is paper-pieced using a plain piece of paper that i had reandomly stamped using the same stamps as the background on the main card


I absolutely love this gorgeous stamp - she was my first ever purchase from Paperbabe Stamps

I trimmed the Image down, inked the edges and then matted using cardstock that I have also used for matting on the main card

I created the back ground using lots of Paperbabe Stamps from the following sets 'Folk Fabrique', 'Oriental Zen' and 'Bottlebrush Trees' - I then created some matting layers using pretty cardstocks.

I fixed the card together using foam tape in between some of the layers and turned the image to a jaunty angle before fixing down.

I finished my card with a 'Thank You' sentiment stamp also from Paperbabe Stamps and Paper Flowers & a Pearl from my own stash

Thank you for visiting today hope you will come back soon

Krafty Hugs xx

Fashionette's 'Mary' - Bee Crafty

Hiya and welcome to my Friday Post for Bee Crafty
This week I have been back into my comfort zone of pretty & girly
I chose to colour 'Mary' she is such a pretty girl and I matched her to a pretty floral paper 


I coloured her using my fave alcohol markers in colours to compliment the theme of the paper, trimmed the image down and inked the edges using Distress Inks 'Tattered Rose' & 'Spun Sugar'


To create the foliage I stamped the larger branch from the 'Branches' set using Distress Inks 'Forest Moss' & 'Crushed Olive', I cut them out and layered them up with some paper flowers and buttons

I added lots of  layers and jaunty angles as I love them

I pinched a sticky note from my planner stash to create the tab for the sentiment which I stamped using some Wordage stamps 'With Love' and 'Hugs & Kisses'


Thank you for visiting today come back soon for more Gorgeous Projects from the Design Team 
Check out the Bee Crafty Facebook Group for lots of inspiration and fun 
Krafty Hugs xx

Friday 8 May 2015

Banksy - Greatness Girl - for Bee Crafty

Hiya and welcome to my Friday post for Bee Crafty
This week I got inspired by and inky/textured piece I saw on pinterest - So I chose to use some polyfiller, inks and one of my New Stamps 'Banksy - Greatness Girl', I really like this stamp and I think this brickwork template was a good choice for the background

First I cut a piece of watercolour cardstock to a few mm smaller than my 7x7 card blank. I love the texture of watercolour card and to bring this out I ran a distress ink pad in 'Antique Linen' over the cardstock. I then chose a brickwork template and applied polyfiller with a small pallet knife, not over the whole of the cardstock but roughly through the middle for an exposed brickwork look.
After letting the polyfiller dry I used a sponge and lemon juice around the edges of the card and to stamp the 'Large Branch' over the top left corner. I dried the lemon juice with a heat gun because when heated with a heat gun the lemon juice burns nicely to create a dark aged effect (smells nice too).


I stamped 'Greatness Girl' using archival ink - and the stamp is so great I got a perfect imprint even over the texture.


I inked through the 'Metal Work Alpha' inkable template using Black Soot distress ink to add to the graphitti look of the project. I also inked the edges using the Black Soot ink. I handpainted some ground under her feet using Chalky Finish paint in charcoal.
To finish the project I painted on mod podge, waited for it to dry and then fixed the project to mirror board before attaching to the card blank.
Thank you so much for visiting my post today - remember to visit again soon for more gorgeous projects by the Amazing Design Team.
Krafty Hugs xx

Friday 1 May 2015

'Mayleedee' - Paperbabe 'Anything Goes' Challenge

Hiya and welcome to my Design Team post for the 'May Challenge' over at Paperbabe Stamps Blog, the theme for this Challenge is "Anything Goes" we would love to see your beauiful entries using Paperbabe Stamps or any of your own stamps


I have used the gorgeous 'Mayleedee' stamp from the Red Rubber section of the Paperbabe Etsy Store

I coloured her using Promarkers


I teamed her up with some colour co-ordinating papers Kraft Card, and decoupage for a lovely layered effect

Thank you for visiting today and I hope you will come back soon to see more of my makes

Krafty Hugs xx

FASHIONettes 'Peggy' - Decision to Try - Bee Crafty

Happy Friday so its my turn to post for Bee Crafty
I ordered some new Stamps & Inkables Templates in the last 2 weeks and couldnt wait to get inky - I love the FASHIONette's so much and I've been eager to try out the templates with my Distress Inks

I stamped 'Peggy' onto watercolour cardstock (which I had trimmed to fit an 8x8 cardblank with a few mm border) using Archival Ink because I wated to use lots of water and didnt want the image to bleed. I then stamped again onto eclipse masking tape and cut her out to make a mask which I fixed over her on the watercolour cardstock.

The background I created by blending 'Antique Linen' & 'Tattered Rose' distress inks using a round blending tool. I then placed the 'Circles' inkables template over the corners and sprayed through with water, then used a 'microfibre cloth' to remove the excess water and lift the colour away from the wet areas too. this showed up quite faint though as the colours I used were a bit pale.

Next I used the 'Metalwork Alpha' inkables template around the edges using 'Victorian Velvet' distress ink. I inked the edges using 'Pumice Stone' distress ink. I sprinkled over some rock salt and sprayed with water, waited for the salt to react a bit then dried the card using a heat gun on a low setting. I brushed the salt off to reveal the speckles where it had reacted with the ink.

Next I stamped the 'Maple Outline' stamps slightly off the page and painted over them using 'Pumice Stone' distress ink. I also randomly stamped the 'Large Branch' BEAUtanicals stamp accross the top of the card and 'Dandies' Backdrop Border stamp along the bottom of the card using 'Frayed Burlap' distress ink.

I also randomly stamped the 'Cow Parsley' & 'Branches' BEAUtanicals stamps randomly using 'Tattered Rose' & 'Victorian Velvet' around the edge of the card.

I reused the 'Circles' inkables template around the corners again dry template this time using 'Antique Linen' distress ink and the round blending tool, this showed up a lot better with the paler colours.


I then removed the mask from 'Peggy' which revealed that no ink had slipped through and she was perfectly blank for me to add colour to. I used Distress Inks as watercolours using a blending mat and a waterbrush. The colours I used were all the same ones from the background.

I matted the finished picture onto dark brown mirror board and attached to my 8x8 cardbalnk using foam tape.

 
Lastly I stamped the 'Decision to Try' WORDage stamp onto an offcut of watercolour card using the 'Pumpice Stone' ink, I then trimmed the words out and matted them onto dark brown mirror board, I then fixed them to the finished card using foam tape for dimension.
Thank you for visiting today, dont forget to check back soon for more gorgeous makes by the Brilliant Design Team and stop by the 'Bee Crafty Facebook Group' to join in the fun
Krafty Hugs xx

TCBOTB Background

Related Posts Plugin for WordPress, Blogger...