Followers

Friday 3 November 2017

Thanks for visiting today, I hope you had a wonderful Halloween 

Over at Paperbabe Stamps Blog we hope you can find a moment to join in with this fortnights challenge which is a lovely and fun...

"Anything Goes"

I know it's a favourite...
so create anything that you've always wanted to try!

Paperbabe Stamps Challenges are open to everyone...
As usual you are welcome to combine with other challenges.
Please be sure to link your project below for a chance to win Paperbabe Stamps Gift worth up to £20*

Here are a few pics of my Design Team Inspiration Project for this fortnight's challenge


*So, if you use Paperbabe Stamps in your projects you have the chance to win £20 of Paperbabe Stamps, otherwise the prize will be £10.

Please enter your fabulous projects over the Challenge Post!
Challenge ends: 17th November 2017
Thank you for joining in!

Friday 13 October 2017

New Release Day - Paperbabe Stamps - Christmas Nativity & MDF Angels

Hiya and Welcome to my Blog

This Week has been really exciting over in Kraft Korner as I have had the Privilege to be working with the New Release Stamps and Fibreboard Shapes from the Nativity Collection and the Paper Angels Collection
by the Amazing Kim at Paperbabe Stamps

The New Products are now Available to buy over at the Paperbabe Stamps Etsy Shop

These little characters are so so so cute and I have loved putting them together and hand painting them to show to you all today


Look at their Gorgeously Cute little faces. I had so much fun painting in the details and bringing them to life using my Acrylic Paints

I glued together the body's and then painted over all of the pieces using white gesso primer. Once dry I gave them a few coats of white acrylic paint. When fully dry I used the co-ordinating stamp set and versafine ink to to add all the outlines and details. I then hand painted all of the pieces to add all the colours, shading and detailing until I was completely happy with all of them. I then finished glueing all the pieces together; all the animals heads to their body's and all the little accent pieces like crowns, gifts, shepherds crook etc

The following photo's show close ups of some of the characters I love the little cows and sheep


I also had a lot of fun creating this Angel using an older Favourite from the Paperbabe Stamps Shop, The Paper Angel's Stamp Set and the New MDF Shapes that co-ordinate


Such a lovely set to work with - I stamped the Angel Stamps onto MDF Shapes that I had pre-painted using white gesso primer and white acrylic paint. 

I chose to use the side flowy dress but you do get the choice of dress shapes in each package of the MDF Shapes which match up perfectly with the dress shape options in the stamp set. Each package of MDF Shapes has a different style of hair which match up with the hair shape options of the stamp set, I am using one of the long wavy hair styles.

I really enjoyed painting all the details using my acrylic paints, especially the Hair, which has always been my favourite part of any character I either paint or colour


I hope you liked having a look at the projects I have made for the New Release Stamps and MDF Shapes that are now available to buy from the Paperbabe Stamps Etsy Shop

Thanks You so much for your Visit and I hope you will join me here again soon for more of my Krafty Korner Adventures with Kraft

Krafty Hugs
Please do go check out the Paperbabe Stamps Blog to see the Gorgeous Project's by Our Kim 
and also the links to the Design Team Blogs

Wednesday 11 October 2017

Paperbabe Stamps - October Sneak Peek time...


We have a few new stamps planned to release this month, yay it has been too long since our Kim has designed some new stamps and she thought it was a great time of year to get started on our christmas Holiday projects!

Here are a few sneak peeks of what's to come!

An adorable stamp set based on our Kim's adorimal animal set, although this one is a cute nativity, with all the characters and adorable animals too.
THEN to coordinate our Kim has designed this substrates kit so you can create your very own free standing nativity scene, along with Star trees.
This is a little random but Kim wanted to include a few smaller stamps in the Paperbabe Stamps range.
 
These Angels are coordinating substrate kits to go with the already released PaperAngel stamp set, wait untill you see the stunning ornaments you can make with these.
And to finish a small set of doodles stars, perfect to add a little decoration, pattern and detail.

Thanks for visiting, pop by tomorrow for the reveal, and Friday we will have an array of samples.

Also, there's still a few days left in the
ends 13th Oct

As well as our

Enjoy a wonderfully creative day!
  Krafty Hugs
 
Kerrie
xx


Friday 22 September 2017

Don't be Afraid to Sparkle - Paperbabe Stamps Challenge - Picture Inspiration

Hiya and Welcome to my Blog

I'm so sorry that I have not been around much of late... I have been quite down but I am slowly starting to pick myself back up 

Today is a Challenge Day over at the Paperbabe Stamps Blog so the Team has been busy making pretties to share with you

The theme of the Challenge is a 'Picture Inspiration'


Paperbabe Stamps Challenges are open to everyone...
As usual you are welcome to combine with other challenges.
Please be sure to link your project below for a chance to win Paperbabe Stamps Gift worth up to £20*
 
You can create any project you like as long as it is inspired by the picture below or the colour scheme etc.

Here's the Picture inspiration...for the challenge 


For my Design Team Project I have picked out the colours from the colour scheme to use in my project. I made a cute little easel card that could be used for any occasion

 
 I picked out a patterned backing paper, complementary coloured cardstock in colours similar to the colour scheme and some silver mirror board for layering.

I created the easel card using a 6x6 cardblank and half of another 6x6 cardblank this time with a scalloped edge. 

The Backing paper I chose to use is A5 and I managed to make this card using only one sheet. First I trimmed a piece to a few mm smaller than the 6x6 cardblank to use on the base of the easel card i then layered using a green cardstock and silver mirror board. For the card front I trimmed a piece of lavendar cardstock to a few mm smaller than the scalloped edge, I then layered with silver mirror board. I trimmed the offcut from the A5 backing paper and attached to the left side of the card front.

I made the easel stopper using offcuts from the cardstock and papers, layer on top of each other and fixed in place using foam tape to created the raised stopper.


for the topper I cut a piece of linen cardstock which I then make an inky painty background using sage and pink inkpads, a waterbrush and an ink blender tool. I then stamped the Large Butterfly solid stamp (from the 'Butterfly Peridae' set) at a jaunty angle using a mauve ink. I added a sparkle trail using wet glue and dazzle dust glitter. I inked the edges using versamark ink which I then dipped into Snowflake Tinsel' embossing powder which i then heated using a heat gun.

I stamped and embossed the Large Butterfly details stamp (also from 'Butterfly Peridae') using versamark and the same embossing powder as before onto vellum. I fussy cut the butterfly, shaped the wings with a bone folder tool to created depth. i attached over the butterfly i had stamped previously using wet glue. The vellum butterfly gives the ellusion of movement to the wings. for the body i used a few little wooden substrate pieces from the 'Mixed Media blank accessories' pack. 


To finish I stamped the 'Don't be Afraid to Sparkle' sentiment stamp and the little antenae using grey ink.

I fixed the finished topper to the card front using foam tape for dimension.

So, it's time to create anything, use the picture or colours as inspiration as always be sure you use at least one paperbabe stamps product in your creations, HAVE FUN, and don't forget to link your project over on the Paperbabe Blog

---------- ~ • ~ ---------- ~ • ~ ---------- ~ • ~ ---------- ~ • ~ ---------- ~ • ~ ----------

*So, if you use Paperbabe Stamps in your projects you have the chance to win £20 of Paperbabe Stamps, otherwise the prize will be £10.

Please enter your fabulous projects on the Paperbabe Stamps Blog
Challenge ends: 
 
Thank you for joining in!


Friday 15 September 2017

Male Portrait Substrates - Paperbabe Stamps Etsy Shop Release

Hiya and welcome to my Blog

Today over at Paperbabe Stamps the recently released on Hochanda 'Male Substrates' are today re-released into the Paperbabe Stamps Esty Shop

They are so much fun to put together and to decorate with any medium that you choose

Today I am sharing with you my project using some of the Male Substrates and lots of chalky paints and coloured pencils teamed with the matching Male Portrait Face stamps also from Paperbabe


First I painted all the pieces with white gesso primer. Once dry I then mixed up some nice blue colours for his shirt and jumper which I then painted over the gesso. I made a nice flesh tone for his face and neck and a light brown for his hair. Once I had painted all the pieces with 2 coats I left everything to dry.

I then stamped the shirt using the 'design a knit' background stamp using a dark shade of blue chalky ink pad. And painted some details like the v-neck using the ink residue left over on  the stamp with water and a paintbrush.

I stamped the eyes, nose, mouth and details using the 'male portrait face stamp's' I then painted in details like eyelids and blended in his nose using slightly darker shades of the flesh tone paint I had mixed by adding a tiny but of brown to the previous flesh tone.

Once dry I used coloured pencils to add sharing and depth to his face and hair. I love how the texture of his hair came out.

Please check out the Paperbabe Esty shop to see all the new substrates that are now available, lots of different hair styles and accessories to create any styles you like.

Thanks you so much for visiting my blog today, come back soon for more projects from me

Krafty Hugs Xx
KERRIE

Friday 2 June 2017

Mayleedee Little Red - Sketch Challenge - for Paperbabe Stamps

Good Morning and Welcome to my Blog

Today is the start of  the fortnightly challenge over at Paperbabe Stamps Blog

The theme for this fortnight is a Sketch Challenge using the Image below as a guide for your project's layout... Create anything you like and as long as we can see the sketch in your design anything goes


Use the sketch in any creative way that you want, flip it, turn it be inspired by it. The flower can represent any image or embellishment and "paperbabe stamps" any sentiment.

Paperbabe Stamps challenges are open to everyone...
As usual you are welcome to combine with other challenges.

Please be sure to link your project below for a chance to win Paperbabe Stamps Gift worth up to £20*

Here is my Design Team project for the Challenge... I flipped the sketch 


I chose to use 'Mayleedee Little Red' clear polymer stamp for my main image and I coloured her using coloured pencils, I used ribbon and lace for my accent strip and the 'Thank You' sentiment from the 'Mayleedee Little Red' stamp set

I chose a pretty backing paper which i then chose pencil colours to match in with the colours in the paper, I fixed some paper roses to my card inspired by the speckles in the sketch

I hope you like my project and that it might inspire you to join in the challenge this fortnight... check out the Paperbabe Stamps Blog to see more gorgeous inspiration from Kim & the Design Team

Krafty Hugs xx

Monday 8 May 2017

Never Regret! - Wordage & Beautanicals - for Bee Crafty

Hiya and Welcome to my Monday Design Team post for Bee Crafty

Oh my Word!!! It has been a crazy week here at KraftyKezzlaHQ - we have no broadband at home for 3 weeks so I am having to use my mobile as a Wifi Hotspot which I do not have too much data left so I am having to use my internet sparingly - not good for a social media geek lol

So while I can not be online as much as I would like I have been moving all the bedrooms around in my house!! which is nuts as its 4 rooms that are now all topsy turvy while I sort through and delclutter... but it also means some good news... Hubby and I are moving our bedroom to the back of the house which will then leave me free to use the front room we are now in as my Work/Office/Kraftroom like we always intended to eventually... it is going to be amazing to be able to leave all my stuff out where I like and be able to shut the door at night without having to shift ot all away each night YAY!! It is going to be mega!!

Now back to my post after all that chatting lol

This week I am sharing with you an older make from me where I have used the fabulous 'Never Regret' - WORDage Stamp as the main focal point of the card and then created a flower from the leaves of the 'Maple' stamp and the larger branch from 'Branches' stamp set both from the BEAUtanical Collection


For the flower I repeat stamped the maple leaf onto pearlescent card, fussy cut them, embossed them from the reverse and layered them up overlapping to create the bloom, the leaves I stamped using the branche stamp which I also fussy and fixed under the flower.

I teamed these lush stamps with some pink, brown, kraft and cream cardstock, some circular dies, flatback pearl and some polka dot ribbon, on a 7x7" cardblank

Thanks You so much for visiting my post today - please come back to the Bee Crafty Team Blog again soon for more yummy inspiration from the Amazing Design Team

Krafty Hugs xx

Monday 24 April 2017

Planning with my Bee Crafty Polymer Stamps

Hiya and Welcome to my Monday Post for Bee Crafty Stamps

This week I have been getting ahead with my 'Filofax - Planning' and I have decorated this week's pages and my May monthly spread using some of my favourite Bee Crafty polymer stamps


Bee Crafty Products used:

BEAUtanicals - Branches - polymer stamp set
BEAUtanicals - Tall Elder - polymer stamp
WORDage - Dream - polymer stamp
WORDage - Beautiful Things - polymer stamp

I really love to use my non-planner crafty stash in my planners as it helps me to expand on what I have brought for my planning, but also as I love to use my planner for memory keeping as well as planning my day to day stuff

I chose colours of stamping ink to complement the mushroom coloured leather of my current planner (I have a big colletion to choose from each month) 

I decided to use the same stamps for my weekly layouts in May as I used for my Monthly spread.


I stamped using versamagic chalky ink's in the following colours

Wheat: for the script stamp
Sage: for the larger branch stamp from the set
Sahara Sand: for the Tall Elder stamp (I just used the top part)
Jumbo Java: for all the Wordage stamps

I stamped them around the edges and over the notes section to leave the main pages blank for filling in the details of my week


I used the same stamps and colours for the my Monthly spread


I really like how the colours work with my chosen planner for May

Thank You so much for visiting My Blog today I hope I have inspired you to use your Bee Crafty Stamps in more of your projects as well as your Cardmaking

Visit the Bee Crafty Team Blog to see more inspiring makes from the Brilliant Bee Crafty Design Team

Krafty Hugs xx

Monday 17 April 2017

Love and Chocolate - Black & White - for Bee Crafty Stamps


Hiya and Welcome to my Monday Post for Bee Crafty Stamps

Bee Crafty Products used:

Wordage - 'All You Need is Love' - polymer stamp
Fabulous Flowers - Star Flowers - polymer stamp set
Beautanicals - Branches - polymer stamp set

I hope you are all having a lovely Easter with your families & friends - I was inspired but Easter Chocolate for this make but went with a Black & White, Classic look instead of the traditional bunnies and eggs for Easter


Firstly I crocheted some white flowers and stitched through some buttons using white yarn. Then I repeat stamped the Star Flowers and larger Branch onto white cardstock using black versafine ink. I then spent some time fussy cutting them out


I then trimmed a piece of black card to 1/2 cm smaller than my 7x7 card blank. Then I trimmed a piece of white cardstock to 1/2 cm smaller than the black piece. I ran some black card stock through my embossing machine using a burlap embossing folder and cut a strip of this to fit the width of my card. I layer the black and white card pieces onto the card blank using strong glue, I stamped the Love and Chocolate sentiment onto the top corner and mounted the black embossed strip to the card front using foam tape.


I then arranged the Branches, Crocheted Flowers and Star flowers and when i was happy with how they looked I fixed them down using my hot glue gun


I then fixed some gems using glossy accents to the flower centres, and scattered some around


I love how this project turned out as I really love non-traditional themes and colours during the seasonal occasions through the year


I made 2 more slightly altering the layout each time


Thanks You so much for visiting the Bee Crafty Blog please do visit again soon to see more Awesome Projects from the Amazing Bee Crafty Design Team, they are such a Talented Bunch 

Krafty Hugs xx
Visit Bee Crafty Stamps Blog to see more examples from the Talented Bee Crafty Design Team

Monday 10 April 2017

Simplicity - Beautanicals - Black & White - for Bee Crafty Stamps

Hiya and Welcome to my Monday Post for Bee Crafty Stamps

Today I wanted to share with you a make that is a Simplistic make from black and white cardstock
I love the Black & White look its simple but dramatic as well


Bee Crafty products used:

BEAUtanicals - Tall Elder - polymer stamp
WORDage - Simplicity is Sophistication - polymer stamp
Inkables - Oval Lace - Template


First I stamped the Tall Elder stamp onto a piece of Linen Card using Versafine Ink, I then trimmed this piece about 1cm around the edge of the image. I stamped the Simplicity is Sophistication stamp onto an off cut of white card. I matted both these pieces using black card.


I then took a piece of pearlescent white card and trimmed to 5mm smaller than a 6x6 card blank, I ran this card through my embossing machine using the Oval Lace template underneath it to create a raised pattern on the card


In this picture you can see the pretty shine from the pearlescent card and the pattern from the template shows well too

I matted the pearlescent backing I created with some black cardstock and stuck to the front of the card blank using a strong glue. I layered up the Tall Elder image and the sentiment using some foam tape. I finished the card with some jet black flat backed gems.

Thank You so much for visiting My Blog today... come back soon to see more of my Projects

Krafty Hugs xx
to see more Design Team Projects from the Bee Crafty Design Team... follow the link below

Monday 3 April 2017

Beautiful Dream - Fashionette's Peggy - for Bee Crafty Stamps

Hiya and Welcome to my Blog

Phew, it's the Easter Holiday's... I love Holiday's as I get to spend more time with my lovely Kiddies. This Week our eldest Daughter Ashleigh turns 15!!! where does the time go?? I mean only yesterday I was cuddling my Beautiful Baby Girl in my arms and now she is all grown up

Now back to my post lol... I have been playing with my Copic Markers and Distress Inks this weekend I love love love them but for a bit of a change I have been inspired to use green's and blue's by my lovely friend Tina who sent me a gorgeous Tag with those colour's not so long ago

Today's Make is using some of the Gorgeous stamps from Bee Crafty Stamps


Bee Crafty Products used in this project:

Fabulous Floral - Star Flower - polymer stamp

Other Products used:

Distress Ink - Tumbled Glass, Broken China, Peeled Paint, Shabby Shutters
Memento Ink - Tuxedo Black
Versafine Ink - Black
Versamark embossing clear ink
Embossing Powder - Clear (with heat tool)
Die's - Florishes
Copic Markers - various colours

Black cardstock
Aqua mirror board
8x8 card blank
paper flowers
flat backed gems


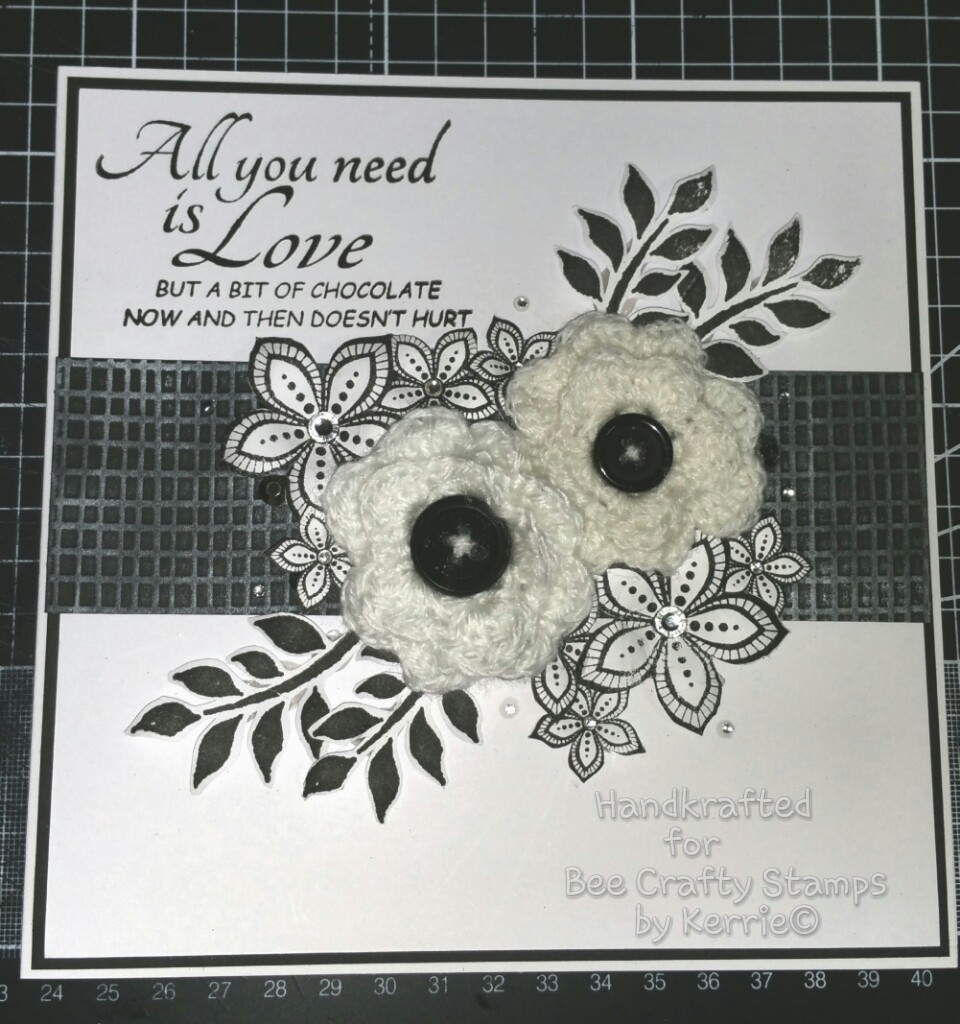
I stamped the Script stamp over a piece of white linen cardstock (that I had trimmed to 1/2cm smaller than an 8x8 cardblank) using Versamark embossing ink, I then tapped some clear embossing powder over and heated with a heat gun to create a raised effect which will then work as a relief when inking over with distress inks, I chose 2 shades of both green and blue inks and blended them over the heat embossed background using foam blending tools. 

I then stamped the Clover stamp along the bottom edge of the card using Versafine ink which I gave a quick blast with the heat gun to speed up the drying time


Next I stamped Peggy onto colouring cardstock (a smooth type perfect for alcohol markers) and I coloured her using copic markers using 3 sets of colours which blend well together and nicely match the tones in the background I had created. I then fussy cut her out using a pair of small but sharp scissors. I then fixed her to the background using tacky glue. I also stamped and coloured the Dog and fixed him to the background too. I matted this picture with black cardstock and fixed to the card front using all purpose glue. 


I then die cut some flourishes using 3 metal dies and some cardstock I chose the same black from earlier and some aqua mirror board. Next I layered up some paper flowers and some foliage. I stamped, coloured and cut out some of the Star Flowers from the Floral stamp I shaped them using an embossing ball tool and layered them in with the paper flowers. All the flowers are attached using my hot glue gun. I finished off the card with some flat back gems for a touch of Bling.

For the sentiment I used the large Dream Wordage stamp with just the word Beautiful from the Wordage Beautiful Things stamp, which i stamped using black ink. I inked the edges and matted using black card and attached to the cardfront at a jaunty angle using foam tape.

I actually really like this card as I stuck to my favourite style of cardmaking but used colours that are usually very alien to me but I think really do work well together for this project.

Thank You so much for visiting my Blog today I really do appreciate all the visits and comments I get on this blog 

Krafty Hugs xx

Friday 31 March 2017

Paperbabe - Blog Hop - Chris Dark 'Garden Fairies'

Hiya and Welcome to my Blog 

It's a Blog Hop kinda day over at Paperbabe Stamps and I have been lucky enough to join in using these gorgeous New Stamps by Our Chris

If you arrived here from Terri's Blog then you are in the right place but if this is your first stop please do follow the Hop from the start to see what the whole team and guests have to show you today 

We are very excited to announce a guest artist in the Paperbabe Stamps family and to celebrate we are having a little blog hop...

The very talented Chris Dark has designed a collection of beautiful Garden Fairies Stamps, the Butterfly Catcher, Butterfly Emerges, Butterfly Fairy, and Musical fairy, they are a larger set and each includes a beautiful sentiment.


To add extra fun to our blog hop... we are offering up a prize! 
of the whole garden fairies collection to one lucky winner.

Here are the details:
  • A winner will be chosen at RANDOM from any of the designer's blogs and the PaperbabeStamps Blog to win.
  • Just leave a comment on any of the designer's blogs listed below or the Paperbabe stamps blog for your chance to win! (you do not need to comment on all blogs to qualify but it increases your chances) 
  • Deadline: You have until midnight on Sunday, 2nd April to leave a comment.
  • Please check the Paperbabe Stamps blog on Wednesday, 5th April to see if you are one of our lucky winners.
Here's a sample from me...


I made a Dashboard for one of my Filofaxe's using 'Musical Fairy' by Chris Dark

I stamped her onto smooth card using smoke grey versafine ink and coloured her using Copic Markers and then adding some gold details using a metallic sakura gelly roll pen, I also used some of the mini flower stamps that come with the set and the matching sentiment. I then laminated and punched the dashboard to fit into the front of my Filofax Original in Nude.


Close up of 'Musical Fairy'

Today, we’ve enlisted some super talented designers to inspire you with ideas on how to use these beautiful new garden fairies! Hop along for lots of fun and inspiration! 
Carole C

Have fun on the HOP!

So your next stop is..... Carole C's Blog

Thanks You so much for visiting my Blog today.... enjoy the HOP and Good Luck for the Random Draw at the end...

please do leave a comment for us all to be in with a chance

Krafty Hugs xx

TCBOTB Background

Related Posts Plugin for WordPress, Blogger...